Creating a Multi-audio and Subtitle Menus using DVD Lab
Courtesy of 2COOL with maa’s multiple audio guide for assistance
Tools I used:
DVD Lab
IFOedit 0.95
The reason why DVD Lab is a great program is that not only does it gives you better menus but it can accept VOBs with multi audio and subtitles. A lot of authoring programs don’t give you that options as that they want you accept only elementary streams and most of them don’t even let you keep subtitles.
This is just a basic guide to get you going as the more you learn on DVD Lab, the better your menus get. In this guide, I will show you how I got my authored movie with a Audio menu to toggle which one I have and also a Subtitle Menu, to turn on or off which ever I have present.
It may be a little long because I had to stop to explain some things. Keep in mind, there are newbies on the scene who are still trying to learn about authoring.
With that said, let’s get started. In this guide, I used a single VTS, single PGC movie with 3 audios and 3 subtitles.
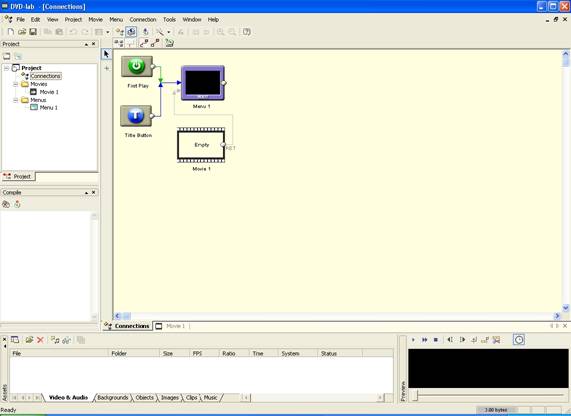
1. Open DVD Lab.
2. We need to import your multiple audio and subtitles VOB by right clicking Assets sections. Video & Audio should be selected by default.

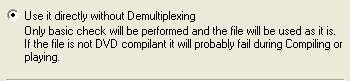
3. Click on Import and browse to your VOB and open it. Select below because we want all our streams intact.
4. Drag your VOB file into Movie 1.
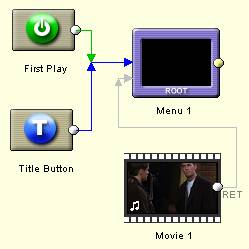
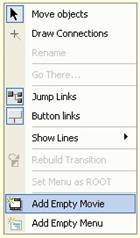
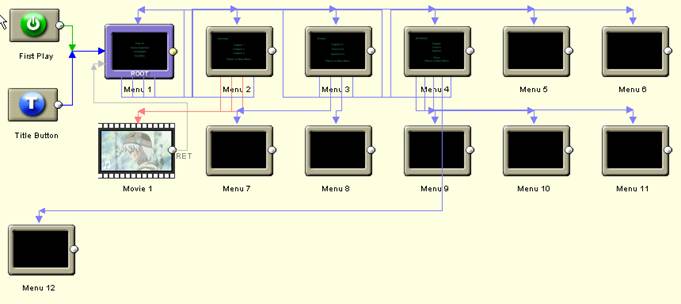
5. Right click in Connections area and add empty menus. For this example, we need a total of 12 menus. This will amount will vary on how many Audio and subtitles your movie has. Here’s the breakdown on how many menus to add. A Dummy Menu is a menu that has no buttons.
1 Main menu
1 Scene Selection Menu
1 Audio Menu (contains three audio buttons)
1 Subtitles Menu (contains three subtitles buttons)
1 Play Movie (Dummy Menu for this Main Menu button)
1 Audio 1 (Dummy Menu for this Audio Menu button)
1 Audio 2 (Dummy Menu for this Audio Menu button)
1 Audio 3 (Dummy Menu for this Audio Menu button)
1 Subtitle 1 (Dummy Menu for this Subtitles Menu button)
1 Subtitle 2 (Dummy Menu for this Subtitles Menu button)
1 Subtitle 3 (Dummy Menu for this Subtitles Menu button)
1 No Subtitles (Dummy Menu for this Subtitles Menu button)
Note 1: Though I used one Scene Selection Menu, you can add another empty menu if you have more chapters.
Note 2: Each audio option in audio menu needs a dummy menu
Note 3: Each subtitle option in subtitle menu needs a dummy menu
You should have this now.
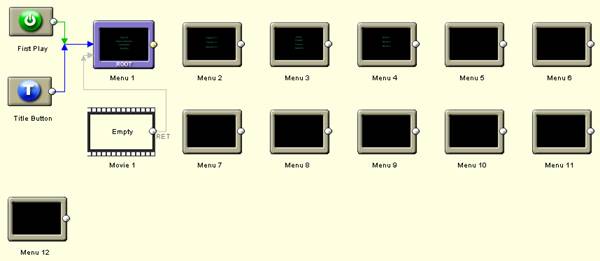
3. Double click in Menu 1. Add 5 empty text buttons and start placing them from top to bottom as below. One of them will only be a Menu Title with we will have no links attached. The others will be linked in later step.

4. Double click on Menu 2 and create your scene buttons.
5. Double click on Menu 3 and create your existing language buttons.

6. Double click on Menu 4. Create and add buttons as below.
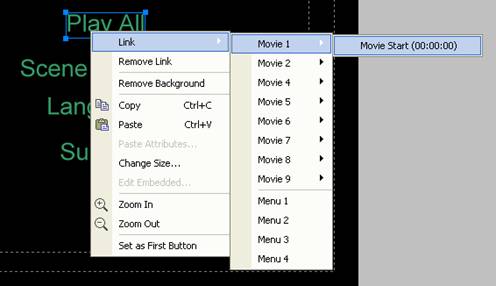
7. Double click on Menu 1. We are going to link our buttons. Starting with our top button and working down, right click on Play All button and select Link > Movie 1 > Movie Start.
8. Using the same procedure, repeat with other buttons using link guide below.
________________________________________________________
Menu 1 (Main Menu)
Button 1: Play All Link > Menu 5
Button 2: Scene Selection Link > Menu 2
Button 3: Audio Link > Menu 3
Button 4: Subtitles Link > Menu 4
________________________________________________________
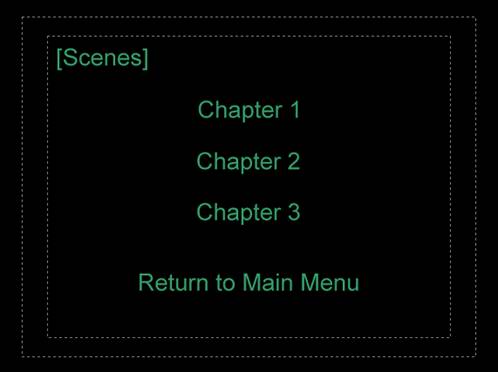
Menu 2 (Scene Selection)
Button 1: Chapter 1 Link > Movie 1 > Movie Start
Button 2: Chapter 2 Link > Movie 1 > Chapter #
Button 3: Chapter 3 Link > Movie 1 > Chapter #
Button 4: Return to Main Menu Link > Menu 1
________________________________________________________
Menu 3 (Audio Menu)
Button 1: English 5.1 Link > Menu 6
Button 2: French 2.0 Link > Menu 7
Button 3: Spanish 2.0 Link > Menu 8
Button 4: Return to Main Menu Link > Menu 1
________________________________________________________
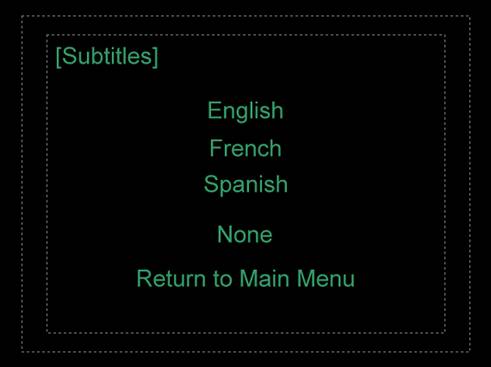
Menu 4 (Subtitles Menu)
Button 1: English Link > Menu 9
Button 2: French Link > Menu 10
Button 3: Spanish Link > Menu 11
Button 4: None Link > Menu 12
Button 5: Return to Main Menu Link > Menu 1
________________________________________________________
9. You should now have this.
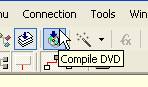
10. All we need to do now is compile.
11. You have errors because Menus 5 to 12 don’t have anything in them. Don’t worry about them. They will be what we call “dummy menus”. Press OK.

12. Select as below and press Start.
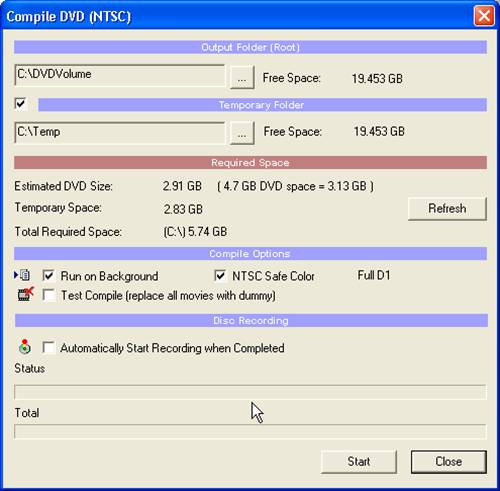
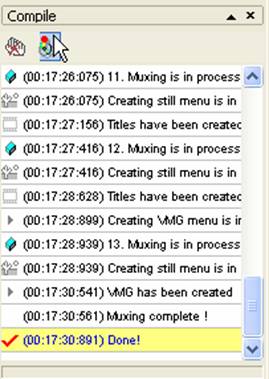
13. Compile done.
Note: BACKUP YOUR IFOs AND BUPs TO A SEPARATE FOLDER. You will be doing a lot of editing so just in case you messed up on editing, you can always copy over your original IFOs and BUPs over your badly edited ones. Get VTS Sectors to refresh screen.
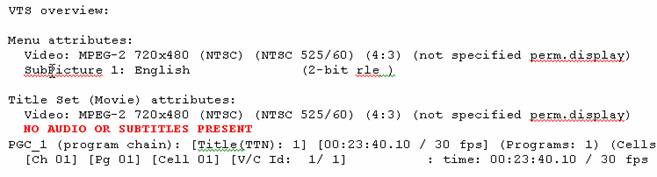
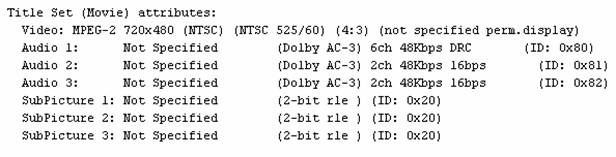
14. Before we go to work in each menu’s PGC Command table, there are some things we need to work on. There is something you should see before we go further. The example used in this guide has 3 audio and 3 subtitles. Remember that we decided to not demultiplex it. But if I went to VTS_01_0.IFO / VTS overview / Title Set (Movie) attributes, it didn’t show any present. You might have audio present but you won’t have any subtitles though. I guess that’s the way DVD Lab works.
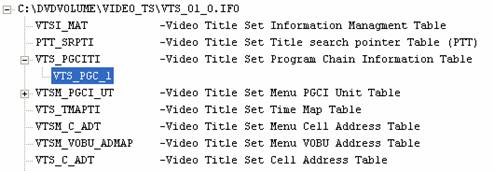
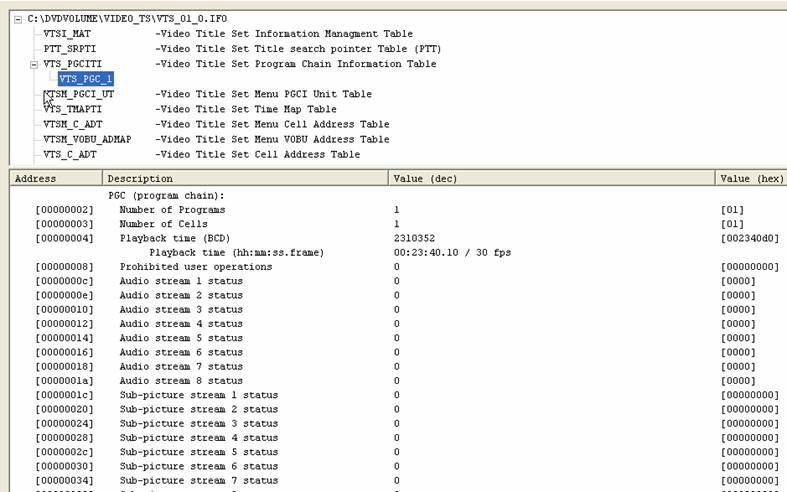
15. Go to VTS_01_0.IFO / VTS_PGCITI / VTS_PGC_1.
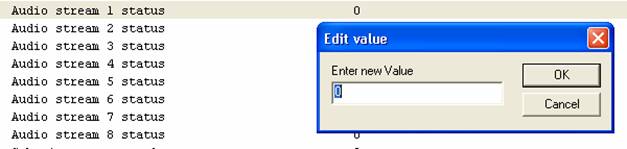
16. In your stream status area, you’ll probably have nothing. We need to correct them as the original IFO that came with your imported VOB in your DVD Lab project.
17. Here’s the VTS_PGC_1 in the original IFO. Open up yours and we will be doing some copy and pasting.
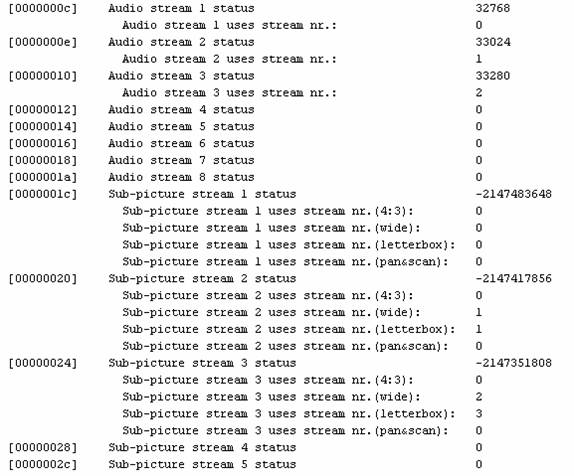
18. Double click on “Audio stream 1 status” line to bring up “Edit value” window. Do a Control+C to copy highlighted value to clipboard.
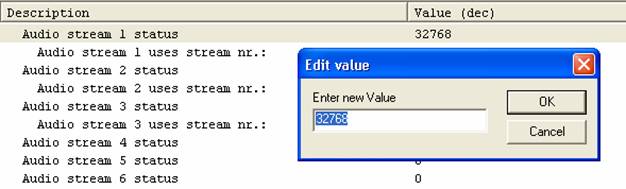
19. Go back to your DVD Lab’s VTS_PGC_1 and double click on that “Audio stream 1 status”. You will have a highlighted “0”. With value highlighted, do a Control+V to paste clipboard value. Press OK to set.
20. Repeat copy and paste with all existing streams so that your DVD Lab IFO is corrected like the original in Step 18.
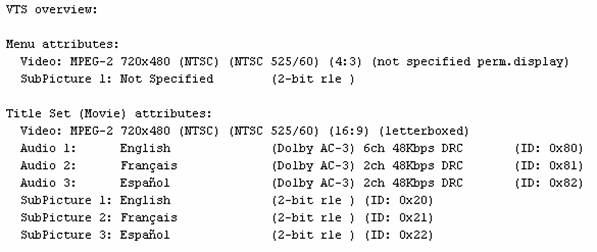
21. Now if I go back to VTS_01_0.IFO / VTS overview / Title Set (Movie) attributes, I have this now.
22. We need to fix all our “Not Specified”. For advanced users, they pretty much know what to change but in case you have any problems, use your original IFO again and reference to that. We will start with Audio 1. Double click on this line to bring audio attributes window for this audio.
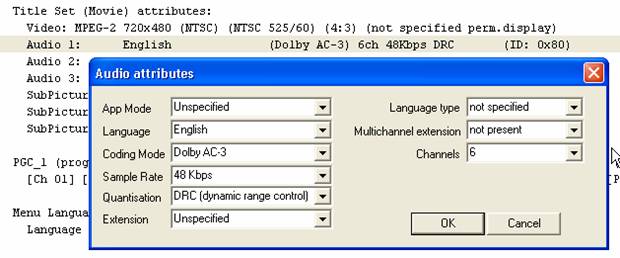
23. This is what I have in my original IFO. Correct your DVD Lab IFO to reflect this. The two main values you probably need to change is Language and Language type.
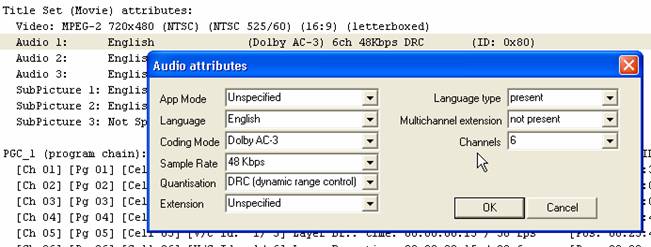
24. Repeat corrections for all existing audio and subtitles in your DVD Lab IFO.
25. Our DVD Lab Title set (Movie) attributes should be this now. Much better.
26. Now we can work on our dummy menus. Open up our DVD Lab movie’s VTS_01_1.IFO in IFOedit 0.95. In your VTS_01_1.IFO / VTS overview / Language Menu Unit, the menu #s have shifted down by 1 but the order is still the same.
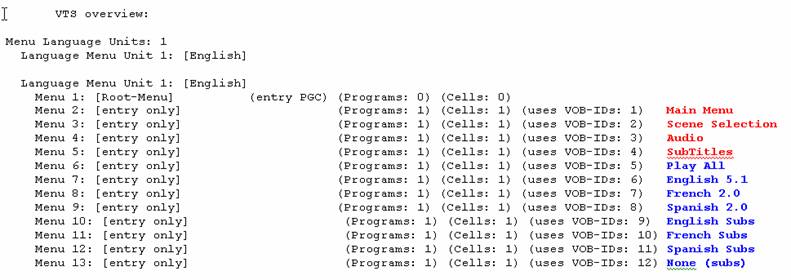
27. All menus will be residing in VTSM_PGCI_UT.

How to HexEdit commands in IFOedit
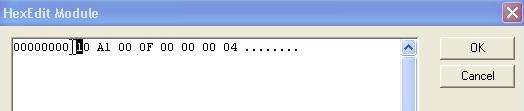
Before we go any further, most of the new commands you will be using, you would have to use a Hex Editor. For less confusion, we will Hexedit all commands. When you are told to “HexEdit”, you will double-left click on line and a HexEdit Module will pop-up.
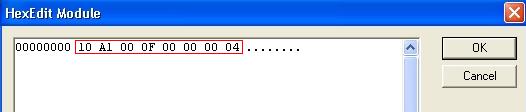
Click your cursor in the module. This is your hex value you will be told to change. Once you click in, you can use enter your number through your keyboard and also use the direction keys to move cursor. When done entering new values, press OK to set.
How to refresh screen after HexEditing
IFOedit refreshes the screen when you Edit so that you can see your changes but it doesn’t do well when you HexEdit. This is a personal trick I do to get your screen to refresh or update. Down left, you will see your “Show Reserved Values” checkbox. Toggle by checking with cursor and then unchecking. You will see your screen update. Scroll down to confirm your changes.

28. Did you get all that? Okay, let’s start with our Play All button in our main menu. Go to / VTS_PGCI_UT / PGC-Menu_6 / PGC Command Table. You probably would have something like this.

We need it to look exactly as below.

29. Let’s Add and delete some commands so that we have the correct amount. We should have only 4 Pre Commands. Let’s get rid of our Post Commands. Right click on Post Command #1 and select “Delete Command”. By doing so, this command will be deleted and all remaining Post Commands will shift up. For PGC-Menu_6, delete all your Post Commands.

30. Add 2 two Pre Commands by right clicking on any Pre Command.

You should have this now.

31. Here is the PGC Command Table again that we want in this menu so HexEdit your old values with new values. Save your IFO and BUP if you have successfully edited.

By now, you should be comfortable and familiar with HexEditing. Therefore I will give you the rest of the new values.
PGC-Menu_7 (Audio 1 link in Language menu)

PGC-Menu_8 (Audio 2 link in Language menu)

PGC-Menu_9 (Audio 3 link in Language menu)
PGC-Menu_10 (Subtitle 1 link in Subtitle menu)

PGC-Menu_11 (Subtitle 2 link in Subtitle menu)

PGC-Menu_12 (Subtitle 3 link in Subtitle menu)

PGC-Menu_13 (No Subtitles link in Subtitle menu)

PGC-Menu_1 (Root Menu) This edit is needed so that if you press your Root Menu button during play, you will go to your main menu
instead of last menu. Just HexEdit Pre Command #1. Don’t insert, add, or delete.

We also need to add a New Pre Command in your / VTS_PGCITI / VTS_PGC_1 / PGC Command Table.

HexEdit this PGC’s NOP Pre Command with this new hex value.

Now is a good time to save if you haven’t already.
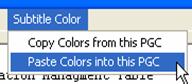
32. Okay, our subtitles are blurry so we need to correct them as our original subtitle. Again, using your DVD Lab imported VOB’s IFO, go to / VTS_PGCITI / VTS_PGC_1. At the top, select SubTitle Color and “Copy Colors from this PGC.

Don’t close IFOedit at this time and go back to your DVD Lab authored movie’s IFO / VTS_PGCITI / VTS_PGC_1. Now go topside and select “Paste Colors into this PGC.
33. Save your IFO and BUP
34. Almost there, we have one more thing to do. We need to have our menu buttons on our remote control so that if we press our subtitle or audio button, our targeted menu will display.

We know which menus our Scene selection, audio, and subtitle resided in so go to / VTSM_PGCI_UT.

35. This is where you can configure your menu buttons on your remote. By default, Menu_1 will always be your Root menu.

36. . Here are the other masks you will need for correcting. Keep in mind, you can only have one menu configured.
Menu_#: VTSM_PGC Category Menu mask 0 131 132 133 134 135
entry PGC: no yes yes yes yes yes
Menu Type: entry only root sub-picture audio angle PTT (chapters)
So using the mask guide above, and correcting our Menus, this is what we should have after editing.

37. Save your IFO and BUP.
38. Preview and test your movie in IfoEdit.
That’s it!